🥷Mastering Elastic Wear with Clear Aligners: A Ninja-Level Guide
🥷Mastering Elastic Wear with Clear Aligners: A Guide for Clinicians
When it comes to fine-tuning occlusion and enhancing control in clear aligner therapy, elastics are an indispensable tool. These small yet mighty auxiliaries provide the extra force needed to guide teeth into more ideal positions, especially in complex malocclusion cases.
For dental clinicians, understanding when and how to prescribe elastics—and ensuring patient compliance—is essential to maximizing clear aligner success. In this post, we’ll dive into the clinical rationale, diagnosis tips, treatment planning strategies, and best practices for integrating elastic wear into your aligner protocol.
Why Use Elastics with Clear Aligners?
Clear aligners alone are powerful, but they have limitations in certain movements. Elastics help overcome these challenges by providing directional force to:
-
Correct Class II and Class III malocclusions
-
Resolve midline discrepancies
-
Improve vertical control and bite closure
-
Assist in anchorage management
When used appropriately, elastics enable clinicians to replicate some of the biomechanics traditionally achieved with fixed appliances—without sacrificing the esthetics and comfort of aligners.
Diagnosis and Case Selection
Not every aligner case requires elastics, but for the right situations, they can be game-changing.
Key Indicators Elastics May Be Needed:
-
Class II or Class III skeletal patterns
-
Asymmetric molar or canine relationships
-
Deep bite or open bite tendencies
-
Crossbites with midline shifts
Before prescribing elastics, a thorough diagnostic workup should include:
-
A complete clinical exam
-
High-quality intraoral scans and photographs
-
Cephalometric analysis (when needed)
-
Evaluation of the Curve of Spee, mandibular plane angle, and arch length discrepancies
With this information, you can decide on the elastic configuration and phase of treatment for introduction.
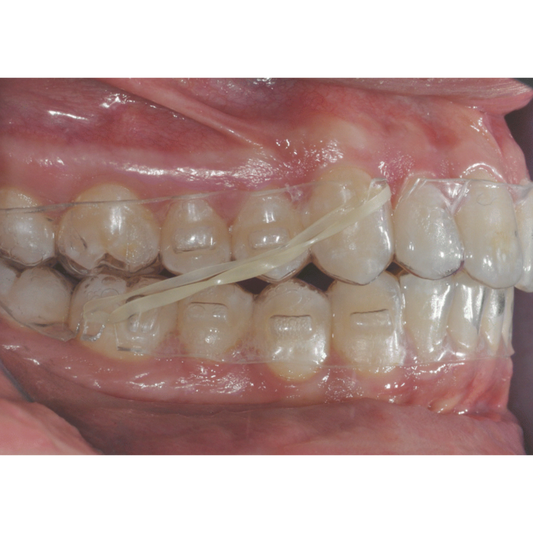
Elastic Configurations and Placement
There are several common elastic patterns used with aligners. Each serves a different purpose:
| Elastic Configuration | Purpose |
|---|---|
| Class II | Distalize upper arch / mesialize lower |
| Class III | Distalize lower arch / mesialize upper |
| Vertical (Box) | Improve intercuspation / close open bite |
| Crossbite (Diagonal) | Correct posterior crossbites |
| Midline Shift | Correct dental asymmetries |
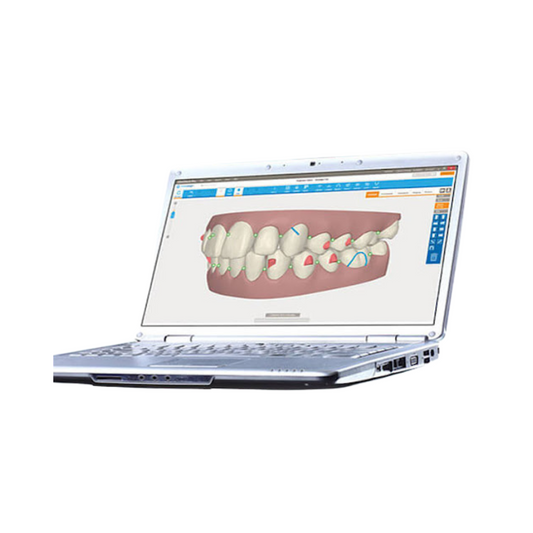
In Invisalign systems, precision cutouts or hooks can be pre-programmed, or placed manually. For other systems, bonded buttons are used on specific teeth.
Pro tip: Always review ClinCheck (or equivalent software) to ensure elastic hooks are placed at the correct time in the treatment sequence, ideally when sufficient anchorage and space are available.
Treatment Planning Considerations
When integrating elastics into your clear aligner treatment, consider these clinical tips:
1. Phased Introduction
-
Avoid introducing elastics too early unless anchorage is stable.
-
Use staging and attachments to control undesired reciprocal forces.
2. Anchorage Management
-
Evaluate whether posterior anchorage is sufficient.
-
Consider adding attachments or auxiliaries if anchorage loss is a concern.
3. Monitor Progress
-
Schedule regular check-ins (virtually or in-office) to monitor tooth movement and wear patterns.
-
Use progress aligners or mid-course corrections if tracking is off.
4. Contingency Planning
-
Plan for refinement or additional aligners if elastics do not yield desired outcomes.
-
Communicate expectations clearly with the patient.
Patient Education and Compliance
Elastics are only as effective as the patient's commitment to wearing them. That’s why education and motivation are just as crucial as clinical planning.
Tips for Promoting Compliance:
-
Explain the why: Help patients understand how elastics will benefit their treatment goals.
-
Use visuals: Diagrams or 3D models showing elastic placement help increase understanding.
-
Set expectations: Emphasize wear time—usually 20–22 hours per day.
-
Make it part of the routine: Encourage habits like putting elastics in right after brushing.
-
Create accountability: Use progress tracking tools or reward systems, especially for teens.
Common Patient Questions:
-
"Will the elastics hurt?" → Mild discomfort is normal for a few days.
-
"Can I take them off to eat?" → Yes, but they must be replaced immediately after.
-
"Do I have to wear them every day?" → Consistent wear is critical—skipping days resets progress.
Troubleshooting and Refinement
Even with excellent planning, elastic wear can present challenges. Keep an eye out for:
-
Uneven tracking
-
Unwanted movement (e.g., tipping or extrusion)
-
Button debonding or lost aligners
Use refinement scans or additional aligners to course-correct. As always, the ninja-level skill is adapting dynamically while maintaining the overall treatment vision.
Final Thoughts: Strategic Elastic Wear is Key
Incorporating elastics into your clear aligner protocols gives you more control over complex movements and occlusal relationships. With proper diagnosis, planning, and patient coaching, elastics can elevate your treatment outcomes—bringing more confident smiles to your practice.